In this second part, we finish replacing the clutch on a Skoda Roomster.
Working underneath the vehicle, the exhaust hangers were removed, followed by the rear gearbox mounting and the lower gearbox shield. All that remained was the removal of the upper gearbox retaining bracket and the lower gearbox retaining bolts. The engine and gearbox were lowered to an appropriate position, and the mounting bracket was removed. With the gearbox supported, the last retaining bolts were removed, and the gearbox was lowered from the vehicle.
The clutch pressure plate and disc were removed from the flywheel and inspected. 80% of the material was worn and would have needed to be renewed soon. Upon inspection of the release bearing, it had become worn and sticky during operation; this was the root cause of the stiff operation of the clutch pedal.
The conclusion was that the clutch kit required replacement. Blue Print clutch kit ADV183056 was used. Included in the kit were a pressure plate, disc, release bearing, release lever and a guide tube.
The flywheel was cleaned and inspected for any heat spots or cracks before the new pressure plate and disc were fitted. When fitting the new pressure plate and disc, it is essential to make sure that the contact surfaces of the pressure plate are positioned correctly and that the clutch disc lining is aligned and fitted fully against the flywheel before the retaining bolts are inserted. The six pressure plate bolts were tightened diagonally and evenly to ensure even contact and to prevent any damage to the pressure plate centring hole and flywheel centring pins.
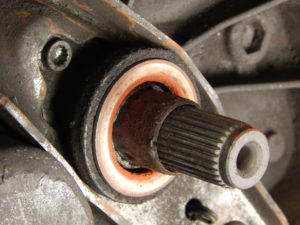
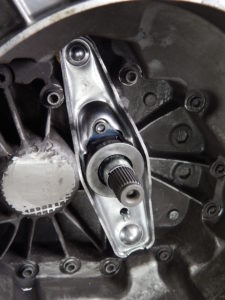
Turning our attention to the release mechanism, the two bolts to remove the clutch release arm were taken out, complete with the guide tube and bearing. This revealed the input shaft seal, which needs to be inspected for any oil leaks. The surface area was cleaned before the new parts were fitted. The pivot points were greased, and the new release arm, bearing and guide tube were installed; and the retaining bolts were tightened. The new release bearing was rotated until the catch pegs could be pushed into the release arm. A test was conducted to check the smoothness of operation.
The gearbox was refitted to the engine using some of the retaining bolts to hold it in place, followed by the gearbox mounting bracket. The engine was raised using the support brace and put back into position. Then, the gearbox and exhaust mountings were refitted. The driveshafts, suspension joints and wheels were then fitted, ensuring all fixings were tightened to manufacturer’s specifications.
Working from the top of the gearbox, the gearbox mounting was refitted, and the engine brace was removed. The starter motor and wiring harness for the reverse lamp switch was refitted. The gear selector levers were reassembled while all mating surfaces were cleaned and lubricated with grease; this will help improve the smoothness of operation. The clutch slave cylinder, selector cables, air filter and the battery, were reconnected. The clock and the one-touch window operation were reset. The clutch operation was tested, and a road test was carried out. The clutch fault was fixed, giving an exceptionally smooth pedal feel and operation.
To read the first part of this Skoda Roomster clutch replacement click here.
Rely on tested, OE matching quality replacement parts from Blue Print. The entire range of clutch replacement parts can be found at partsfinder.bilsteingroup.com.